Categories
UX Prototyping

How to integrate an Axure prototype with a live chat application using Flask and SocketIO.

I recently created a prototype sales flow in Axure that contained a dummy chat button. One of the next requests for prototyping that I received was on testing the actual activation of the chat button and the subsequent screens after. However, I went slightly further than only prototyping the chat button interaction.

Why not add live chat to it so you can test end-to-end ?

Since participating on a few U-lab sessions organised by my colleague, I firmly believe that the more realistic your environment, the better the tester can focus on the actual proces that is being tested. It doesn’t need to look exactly right (although that’s fine too) as long as most or all of the functionality is there. Otherwise a tester can become focused on an missing element and not on the actual prototype.

For instance, the sales flow I previously created contains a general conditions text. At first I just added a page to the prototype so the user could at least click on the general conditions link, but I left the actual page empty.

One or two test users found the empty page, and remarked on it repeatedly – it clearly bugged them, even though it was only a very small part of the flow they were asked to test. So I quickly added the beginning of the actual text to the page. Subsequently there were no more remarks.

So instead of using pre made ‘fake’ speech bubbles to ‘make pretend’ that there was a chat session going on, I got to thinking about my previous experiences with Python and Flask and the way you can use those tools to create a website with very little effort.

Wouldn’t there already exist a way to easily setup a live chat server and integrate it with the Axure sales flow prototype ?

A quick google search later I had found a simple tutorial (made by the wonderful knowledgeable Flask-guru Miguel Grinberg) on using websockets with Flask and Flask-SocketIO, setting up a simple chat application server that could be reached by surfing to the page, allowing actual client-server communication using a javascript socket.io library for the webclient.

The backend : live chat application using the Flask micro-framework

Let’s first describe the ‘backend’ : I used Flask together with some extra libraries like Flask-SocketIO to create the chat server.

[Flask is what is called a framework, written in Python, that allows you to code a web application using only a few tools and templating languages that have been configured to work together. It’s called a micro framework because it allows you to work fairly freely, not confining you too much. A full framework is much more rigid in using databases, templating languages, etc]

Soon after, I had a chat server running that allowed you to start up a browser, enter a room and type in a line of text, hit enter, and have it displayed on two different sessions that were in the same ‘chatroom’.

As long as you are on the same (wireless) network, you can visit the server and chat together in a room. So the U-lab organiser or a third party can run the ‘server’ on his mac, and the tester can use a browser on another device to visit the server url (using another id) and we have a live chat going between the two parties.

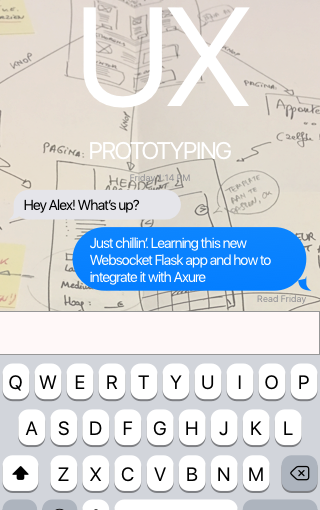
As I wanted to test the mobile view of it, I modified the provided example to use Bootstrap and css-styled it so that the chat lines are not shown as simple text but as speech bubbles, similar to Messenger. If the user entering the chat line is the same as the user it is being shown to, it is shown on the right side of the screen, else it is shown on the left.

Also, I removed the first ‘login’ screen from the example provided so I could call the chat screen up from within the Axure prototype based on url parameters so the user does not have to login any more.

Obviously this had an impact on using sessions (which is being used by the socket emitters to know who is emitting what), as these sessions were established in the separate login screen.

As I didn’t want to rewrite the whole code and only had a few days to set this up, I made it so that the sessions are actually created by the url parameters when the chat page is called.

The result is something that I consider to be unsafe for real live applications, but is ‘Good Enough’ to use for testing a prototype in a U-Lab.

The frontend : Integrating the Axure prototype with the chat app

The integration with the Axure prototype is fairly easy if you want to link on the desktop : you can code up an action to call an external url when clicking on an element, and decide wether to call this up in a new window or in the current window.

I first tried integrating the chat directly into an inline frame that was inside a dynamic panel, however once you use an inline frame you then lose all the session information and you can no longer chat. So it needs to open in a new window/tab.

However, I wanted to test a mobile prototype, and coupled with the above, this caused some fairly unique problems :

  • the user is in the middle of a sales flow, so if (s)he needs to ask for help, (s)he should be able to get back to what (s)he was doing, without restarting the sales flow – so I need to open up the chat application in another mobile window
  • we usually install such a web app onto the home screen, so that Mobile Safari opens up full-screen. However, doing that makes it so that a new window created from there cannot be closed – you can only ‘return to the app’ which restarts the app, which is not what we want
  • using the javascript command window.close() on IOS to close a chat window and return to the prototype is problematic and not something that works consistently. Some browsers for example restart the whole prototype, or refuse to close the window at all. In the end, I could only use it with the ‘Brave’ browser, a fairly new browser for IOS

In the end, to keep everything on the same server, I published an export of the Axure prototype to html and stored those pages in the local chat server under the static directory (flask can easily serve static files as well).

Conclusion

My prototype can call up the chat in a new window, and the user can be returned to it. It is a worthwhile addition to actually see people start up, use, and end the chat.

Templating the chat page itself is fairly easy, it’s just bootstrap css that you can edit.

The chat server is however more finicky than it should be – if the computer hosting the chat server goes to sleep, it is best to restart the chat server. Plus caching by browsers means that if you do make any changes, you need to make sure that the cache in the (desktop) browser is refreshed. Or you keep wondering why your changes do not become visible…

The actual integration with the prototype was more difficult because I was integrating with a mobile prototype. I’ll have to look into this on how to do a better integration next time.

Categories
Blog News

Importing a comma-separated csv file into Numbers Tool

I created this to scratch an itch of mine when reading a csv file into Numbers that contained commas. It turned out that Numbers puts each line into a single cell. It ignores the commas. And there’s no way to specify that the delimiter needs to be a comma, not a semi-colon.

Here’s a small tool made using a small python script and Platypus that will launch as a ‘droplet’ and will allow you to drop a csv file on it that has COMMA (meaning this , ) separated values.

It will accept any csv file and convert from commas (,) to semi-colons (;) and save the result out again as “filename2.csv” – Numbers should be able to open it correctly then. Your original csv file is only read.

Please note that commas inside double quotes are preserved and not converted.

It works on my smallish csv files, but please note :

! WARNING ! THERE ARE NO GUARANTEES THAT THIS WILL WORK FOR YOU – YMMV ! WARNING !

Please note there is NO feedback if something goes wrong.

It works on my 2 macs (using OS X Mavericks), so I figured I would throw it out in the wild for those people who also might need it.

You can download the (non-signed) app here : Com2DotCom.app – you’ll need to open it using RIGHT-CLICKING on the App the first time.

Feedback, comments, bug reports, etc are very welcome. If possible, I’ll try to respond and help you out.

Categories
Blog News

Fun Project : visualisation of all the flemish schools

I’ve had a bit of fun recently with visualising some open data from onderwijs.vlaanderen.be where I downloaded the address list of flemish schools for kindergarten and “lower” schools.

  • imported the csv list via “base” in an sqlite database
  • added longitude and latitude fields to the db
  • wrote a small script that used geopy to query google for each address and add the coordinates to the db
  • then created another small script using pygmaps to create a custom html file which includes the necessary coordinates for each point on the google map.

The result is that I never knew how many schools there were in Vlaanderen !

Schools in Flemish Belgium

You can read more in the original post (in Flemish) that I made on the dataconnect website, where I advertise for my web site design and consultancy. For the full map, click on the above image to go there.

Categories
Blog News

Woes in Python 2.x : UnicodeEncodeError : ‘ascii’ codec can’t encode

Phew ! This is a reminder to myself…

I’ve wrapped my head once already around unicode, but it was so long ago that I had to do it all over again when the error suddenly came up again.

The error I had was the dreaded “UnicodeEncodeError: ‘ascii’ codec can’t encode character u’\xa1′ in position 0: ordinal not in range(128)” error which does not really explain what you are doing wrong but leaves you scratching your head wondering where in heaven’s name you should start looking.

I read the following articles :

But what really solved the problem for me was this StackOverflow answer by Alex Martelli (Bless You Joel Spolsky for this idea and Bless all the people answering there!)

I was in a similar position code-wise : I had a unicode object that I wanted to convert tot utf-8, but I was using the “decode” function.

I actually should have been using the “encode to <codec>” function !

Duh ! Once you have a unicode object, you need to encode it into utf-8 or whatever encoding you need. I was using decode !!!

Oh. Well, perhaps my unicode fu is still not as good as it should be…

Categories
Blog News

Proof of concept for a simple webserver running python code

Here is a small code example using CherryPy to run a very simple webserver that

  • generates a simple math question
  • compares the answer to the solution.

It’s meant as a proof of concept, so there is no security built in. It’s running on localhost on port 8888 (modifiable in the main part of the code).
It allows you to play around and test out your ideas.

Do not use this code on an outside network !

It’s simply an example showing how easy it is to set up a web server and how you can create pages for it using python and CherryPy. It’s been cobbled together in an evening from previous programming so there’s some cruft left in. I’ve also extensively commented the code.

Requirements:

  • python 2.7 ( 2.5 will work as well is my guess )
  • cherrypy 3.2.2 ( use easy_install or pip to download and install the latest version)
  • site.py ( the file containing the python code )

You start the server in a command prompt using : python site.py which will start the server. Leave the command prompt open.

You can then visit the webserver by opening a browser and going to http://localhost:8888 to see the index page and play around with it.

#
# MathPoc : Proof of concept of a simple math problem, bringing it to the browser
#
# Alex Boschmans
#
# Version 0.2, February 2011
#
# 0.2 Added some error checks and expanded math to not just adding but also 
# subtraction and multiplication and divisions. Extensively commented code.

header = """<HTML>
            <HEAD>
                <title>MATH Proof of Concept</title>
            </HEAD>
            <BODY>
        """
footer = "</BODY></HTML>"

indexhtml = """
        <H1>Math Proof of Concept</H1>
        <p>Please answer the following question</p>
                <p>How much is %d %s %d ? </p>
                
                <form action="/response" method="post">
                Answer: <input type="text" name="answer" />
                <input type="hidden" name="number1" value="%d">
                <input type="hidden" name="number2" value="%d">
                <input type="hidden" name="operation" value="%s">
                <input type="submit" value="Submit" />
                </form>
                
        """

def generatequestion():
    # This generates the question that we will pose using the random function
    # Generate a random question using 2 random numbers between 1 and 10
    number1 = random.randint(1,10) 
    number2 = random.randint(1,10)
    # Now we choose an operatioin
    ops = ["+", "-", "x", "/"]
    operation = random.choice(ops)
    # Let's check the division
    if operation == "/":
        # Prevent divisions with remainders using the modulo operator
        # Using module on the two numbers evaluates to 0 when no remainder is present
        # While the modulo remainder is not equal to 0, generate two new numbers
        while number1 % number2 <> 0:
                number1 = random.randint(1,10) 
                number2 = random.randint(1,10)
    # Assemble the html, inputting the numbers in the foreseen places in the html
    # In a more extensive project, you would keep this html in a template file and 
    # call it with a dictionary of items that need to be filled in the template
    question = indexhtml % (number1, operation, number2, number1, number2, operation)
    # Add common html like header and footer - these are defined just once and reused
    # for each page
    html = header + question + footer
    # Return the completed html to the calling function (in this case index)
    return html

# This is the class that the cherrypy server uses and where you create the views that the 
# webuser sees. After each definition there is a <function>.exposed=True that indicates if the 
# webuser can see this page or not. 
class MathPoc:
    def index(self):
        # This is the main index page that is shown to the user when he first visits the site.
        # We create the page by calling the function generatequestion (which is outside the class
        # MathPoc but accessible and we show it to the user by 'return'ing the page 
        page = generatequestion()
        return page
        # The webuser will now see the page and will have a chance to enter an answer.
        # In the html form I've specified that the submitted result will go to the url "response"
        # I've added all the values I want to receive either as hidden values (eg the 
        # original numbers, the operation) or as part of the form (eg the answer)
    index.exposed = True
    
    def response(self, answer, number1, number2, operation):
        # First check if we received an answer or if the user submitted without an answer
        if answer:
            # Calculate our own answer ourselves and generate a response to the user
            # We receive strings, so convert them to integers using int()
            number1 = int(number1)
            number2 = int(number2)
            answer = int(answer)
            # Answer is dependent on operation
            if operation == "+":
                solution = number1 + number2
            elif operation == "-":
                solution = number1 - number2
            elif operation == "x":
                solution = number1 * number2
            else:
                solution = number1 / number2
            # See if the answer is correct and display according the result
            # Using templates, you could put all this in one template and 
            # call the template with options so it knows what to show
            if solution <> answer:
                html = """
                <H1>Sorry.</H1>
                <p>The question was : %s %s %s = ?</p>
                <p>Your answer %s is wrong. The correct answer is %d.</p>
                <p><a href = "/">Try Again.</a></p>
                """ % (number1, operation, number2, answer, solution)
            else:
                html = """
                <H1>Correct !</H1>
                <p>The question was : %s %s %s = %s</p>
                <p>Your answer is correct !</p>
                <p><a href = "/">Try Again.</a></p>
                """ % (number1, operation, number2, answer)
        else:
            # We did not receive an answer
            html = """
            <h1>Sorry ?</h1>
            <p>You need to fill in an answer !</p>
            <p><a href = "/">Try Again.</a></p>
            """
        # Return the page to the user, adding the common html
        return header + html + footer
    response.exposed = True

if __name__ == '__main__':
    import random
    import cherrypy
    import os, sys
    # Set the current directory - this is probably not needed for this example, cruft.
    try:
        current_dir = os.path.dirname(os.path.abspath(__file__))
    except:
        # probably running inside py2exe which doesn't set __file__
        current_dir = os.path.dirname(unicode(sys.executable, sys.getfilesystemencoding( )))

    # Set up site-wide config first so we get a log if errors occur.
    # Adding the setting 'environment': 'production' to the below turns off auto-reload.
    # Otherwise CherryPy monitors the code and any change to code reloads the server - handy for development !
    cherrypy.config.update({'server.socket_port':8888,
                            'server.socket_host':'127.0.0.1',
                            'log.error_file': 'site.log',
                            'log.screen': True})
    # CherryPy will complain of an empty config but will continue
    conf = {}
    cherrypy.tree.mount(MathPoc())
    #cherrypy.config.update({'server.socket_port':8888})
    cherrypy.quickstart(MathPoc(),'/', config=conf)
Categories
Programming

Ouch! Rate limiting on twitter request.

I just ran into the rate limiting of twitter. It hurts. 150 twitter requests an hour, at least for the search you can do more…

Have to think how to give twitter some rest inbetween my scurrying in their databases for user info… I’m gonna sleep on it.

Categories
Programming

Using CherryPy for webform authentication

If you are using CherryPy, I can recommend the webform-based authentication that Arnar Birgisson wrote for ease of use and extensability.

After trying out the included authentication models with CherryPy (I’m using 3.1.2, the last stable version at the moment of writing), I was disappointed in the results. Then I stumbled over a recommandation from someone on Nabble, a web-based programmar’s discussion forum, which pointed to the following wiki page on the CherryPy site:

http://tools.cherrypy.org/wiki/AuthenticationAndAccessRestrictions

The complete program code plus examples are on the page and are well explained.

You can have a skeleton login system (using a hardcoded dictionary) up and running in literally half an hour !

  • Just copy/paste the code on the page and save it as auth.py in your cherrypy script dir.
  • Add the hardcoded dictionary containing username and passwords to it (or script the db access, see the example included)
  • Put ‘require()’ everywhere on your cherrypy pages that need to have login protection – additionally, you can also have roles so that only admins can access certain pages.

Early last week I replaced that hardcoded dictionary and built the db lookup query for the login. Once that was working, I added a ‘my profile’ page to the application I’m working on.  Then I thought it would be nice for the admin to have a ‘create user’ form in the admin section to add users. Done that as well, using the jquery-ui to create tabs and seperate content in the admin section.

All in all, a nice week of nice work.

I’m starting to think this might make it’s way to my hosting server one of the coming weeks…  although I need to do some more work on showing the user only his keywords and not all the keywords, as well as doing something with the keywords to use them better.

Oh and one more thing: this works better under SSL than in the clear http: sky !

Categories
Programming

Simple Python threading.Thread example using Queue

I managed to write a really simple example of using threads in Python that I hope will give more insight on how to adapt my other programming stuff. And re-use this later on, in case I need to revisit this again it would be handy not to scour the internet again to assemble the bits and pieces of threading with Python.

The example below uses 3 threads, and processes 10 pairs of numbers (tuples) that I put in a list.

# Our list of work todo
inputlist_ori = [ (5,5),(10,4),(78,5),(87,2),(65,4),(10,10),(65,2),(88,95),(44,55),(33,3) ]

Those numbers are divided over those 3 threads by the Queue system.

The Queue system itself is limited to 5 slots, although this could easily be changed to more or less. You will notice in the console print that the message “Waiting for threads to finish.” appears after the fifth result, indicating that the queues are being used and the main program has continued on.

After putting everything in the queue system, the program waits for the threads to finish using the .join() function.

All spawned threads keep on being active, running forever, accepting jobs – that is, until the queue is empty, at which point they shut down.

I based most of my simple example on the examples in the Python threading tutorial (.pdf) work of Norman Matloff and Francis Hsu that I referenced before in a previous blog post. However, while their examples undoubtedly do more and are more extensive, they are also more complex. This example is deliberately made as simple as possible so to understand the basic principles of threading and the queue system.

Things I stumbled over:

  • Duh! You spawn the threads before you fill up the queues with stuff todo…
  • When printing out things to the console or python shell, things got jumbled because different threads took over from each other – to solve that I used the threading.Lock().acquire() and threading.Lock().release() to make sure that a thread could finish printing. Not sure if I understand completely all the possibilities this offers.
  • Still a bit stumped on getting more info, name, etc on the thread that is running at the moment – haven’t figured that out yet how to do that.

Feel free to comment and ask questions – if you can improve this program, please let me know !

# threading test
# Alex Boschmans
# www.boschmans.net
# January 2010

#
# IMPORT SECTION
#
import threading, Queue

#
# Variables setup
#
THREAD_LIMIT = 3                # This is how many threads we want
jobs = Queue.Queue(5)           # This sets up the queue object to use 5 slots
singlelock = threading.Lock()   # This is a lock so threads don't print trough each other (and other reasons)

# Our list of work todo
inputlist_ori = [ (5,5),(10,4),(78,5),(87,2),(65,4),(10,10),(65,2),(88,95),(44,55),(33,3) ]

#
# This is called from the main function
# It spawns the threads, fills up the queue with work items that the threads will use
# And then waits for the threads to finish
# This could use some more try:except code...
#
def draadje(inputlist):
    print "Inputlist received..."
    print inputlist

    # Spawn the threads
    print "Spawning the {0} threads.".format(THREAD_LIMIT)
    for x in xrange(THREAD_LIMIT):
        print "Thread {0} started.".format(x)
        # This is the thread class that we instantiate.
        workerbee().start()

    # Put stuff in queue
    print "Putting stuff in queue"
    for i in inputlist:
        # Block if queue is full, and wait 5 seconds. After 5s raise Queue Full error.
        try:
            jobs.put(i, block=True, timeout=5)
        except:
            singlelock.acquire()
            print "The queue is full !"
            singlelock.release()

    # Wait for the threads to finish
    singlelock.acquire()        # Acquire the lock so we can print
    print "Waiting for threads to finish."
    singlelock.release()        # Release the lock
    jobs.join()                 # This command waits for all threads to finish.

#
# Main thread class - based on threading.Thread
# This class is cloned/used as a thread template to spawn those threads.
# The class has a run function that gets a job out of the jobs queue
# And lets the queue object know when it has finished.
#
class workerbee(threading.Thread):
    def run(self):
        # run forever
        while 1:
            # Try and get a job out of the queue
            try:
                job = jobs.get(True,1)
                singlelock.acquire()        # Acquire the lock
                print "Multiplication of {0} with {1} gives {2}".format(job[0],job[1],(job[0]*job[1]))
                singlelock.release()        # Release the lock
                # Let the queue know the job is finished.
                jobs.task_done()
            except:
                break           # No more jobs in the queue

#
# Executes if the program is started normally, not if imported
#
if __name__ == '__main__':
    # Call the mainfunction that sets up threading.
    draadje(inputlist_ori)

Sigh. I just finished adding spaces to show where a def ends, and the damn code highlighter removed it again. Grrrrrr. If you want a copy of the code, let me know and I’ll update this post with a zipped copy of it.

Update: just discovered the “Syntaxhighlighter evolved” plugin and updated the code – indentation now works !!!

Categories
Programming

Not using regular expressions (re or regex) to find a #hashtag (python).

First, a quick reminder for myself: there’s an extremely good guide to regex on Andrew M. Kuchling’s pages.

Secondly, you don’t really *need* regex to parse for hashtags in a tweet – it’s a bit of overkill. The following code will do as well, and was written in 1 minute after searching 15 minutes in regex how to make certain to include hyphens ( – ) and other non-characters if they are put into the hashtag.

The regular expression that I find works quite well for all hashtags that don’t have a hyphen in it:

>>> hashtag = "This is a #hashtag #test-link #a should#not#work"
>>> x = re.compile(r'\B#\w+')
>>> x.findall(hashtag)
['#hashtag', '#test', '#a']

So the above code correctly finds all words beginning with a hashtage, and not the ones that contain a hashtag inside the word. Note that the hyphen and the word after it is not included.

This is the short code I wrote that does all I want:

>>> hashtag = "This is a #hashtag #test-link #a should#not#work"
>>> for word in hashtag.split():
	if word[0] == "#":
		print word		
#hashtag
#test-link
#a

In section 6 of the above-mentioned guide, Andrew states that in some cases string methods (like split) are faster than using regex. For simplicity, I’m going to use the latter code.

Update: Grrr – discovered that the tweets I am processing are in html so have href tags around them – which means ofcourse that there are no blanks for me to split words in. After another unsuccessful session with regex and just to continue I’ve used the BeautifulSoup html parsing library to get around that by stripping out all tags and then splitting the sentence up again. Probably not as efficient as immediately using regex, I’ll have to revisit this in the future.

Categories
Programming

Using threads in Python

I’ve been trying to setup threading in Python, so that in the back-end of my service system that I’m developing I can query more than one source at the same time. So instead of querying one server and waiting for feedback, I can launch 10 threads and thus query 10 servers and process each server’s feedback via it’s own thread.

So a very vague, generalising definition of a thread is an independent ‘process’ that performs a job that you give it. You can control how many threads that you launch. Each thread is a copy of the original thread that you describe (in essence a python def function that has been wrapped in a thread class).

Right now, my understanding of threads is a bit confused. So far it seems that threading has several different manners of implementing them:

  • using a number of threads that you launch, use, and forget about them (they go away)
  • improving on that by putting those threads in a thread pool, and when a thread finishes, re-using it for the next job (so you have  5 threads but 10 jobs to do, those five threads take five jobs, and the first thread that finishes takes on the sixth job, the second thread to finish the seventh job, and so on)
  • the final step seems to be (I haven’t got that far in my implementation) to set up worker bees that are managed by one thread (a better description is promised, as soon as I have understood it!)

Since I’ve been scouring the net for information over threads, here is a list of resources that discuss, give examples, and explain threads – it’s useful for me to refer to, it might be useful for you as well :

  • DaveN has an extensive post, with examples, building up gradually. It’s only at the end that you read that the code shown has never been run, which is a bit of a letdown. Still worth a good read though !!
  • A very thorough 25-page pdf documents that starts from the beginning is available on the site of UC Davis, University of California. It goes into all the nitty gritty details.
  • An example that uses workers in threads is found on the blog of Danial Taherzadeh.
  • Another one that discusses using multiple queues chained together can be found on IBM’s developerworks site.
  • And the blog post from Halotis that started my looking into threads…

Right now I’m using threads in a thread pool, but I’m not doing something right – I noticed that while I have 10 jobs to do, only the first five get done, and the others ‘disappear’.

I guess the only way to get it working is to continue reading the information above until it makes sense. Sometimes I wonder if I’m not slightly masochistic, looking for challenges like that… ai me poor pounding head ! 🙂